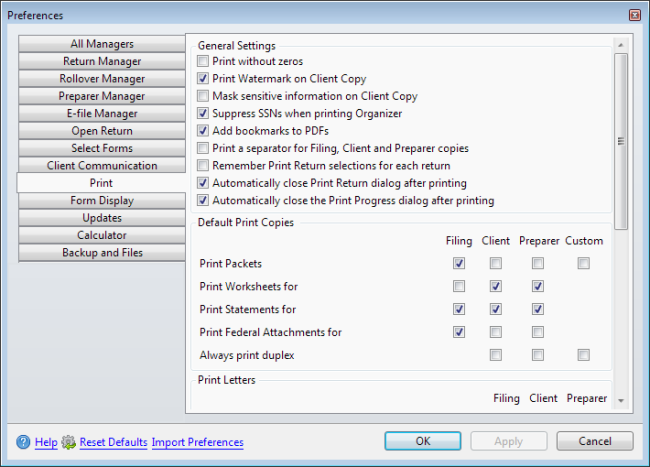
Print Preferences allow you to set up standard defaults for printed copies when you are Printing Returns .

Preferences dialog box (Print tab)
This preference is disabled by default, if enabled, zeros will not be present in all empty calculated and estimated fields when a return is printed. To enable this preference, select the check box.
This preference is enabled by default. When enabled, a watermark will be printed on all pages of the Client Copy. By default, the watermark will read CLIENT COPY. To disable this preference, clear the check box.
Print Packets settings for the Client Copy can be used to customize watermark text if desired.
This preference is disabled by default. If enabled, sensitive information (Dates, SSN/EIN, and Account Numbers) will be hidden in the printed Client Copy. To enable this preference, select the check box.
This preference is enabled by default. When enabled, Social Security Numbers will be hidden in a printed Organizer. This helps to protect the privacy or your clients.
This preference is enabled by default. The PDF Bookmark feature creates bookmarks for available forms in the return, allowing you to quickly access specific information.
This preference is disabled by default. If enabled, a separator sheet will be added between copy types when printed.
This preference is disabled by default. If enabled, ATX will remember any changes you make to a return's print selections in the Print Return Dialog Box prior to printing. Selections are remembered per return. To enable this preference, select the check box.
This preference is enabled by default. ATX will automatically close the Print Return Dialog Box each time a return is printed. To disable this preference, clear the check box.
This preference is enabled by default. When enabled, ATX will automatically close the Print Progress dialog box each time a return is printed. To disable this preference, clear the check box.
These preferences allow you to set certain default Print behaviors by copy type. Settings selected here will be applied as default each time a return is printed. Changes made to Print Packets or the Print Return Dialog Box while Printing Returns will override these preference settings, but only for that print job.
Copy types selected here will be printed with each return that is printed. Filing is selected by default.
Worksheets will be included in printed returns for each copy type selected here. Client and Preparer are selected by default.
Statements will be included in printed returns for each copy type selected here. Filing, Client, and Preparer are selected by default.
Federal Attachments will be included in printed returns for each copy type selected here. Filing is selected by default.
For copy types selected here, returns will always be printed in Duplex (both sides of paper). None are selected by default because not all printers are capable of Duplex printing. Check your printer specifications to determine if your printer supports Duplex printing. Select each copy type that you want to use Duplex printing by default.
Duplex printing is not permitted for Filing copy.
Settings made here will determine which copy types (if any) will include a Client Letter, Return and Est. Voucher Cover Sheets, and/or a Voucher Letter. Client is selected by default to include all three. Make selections as desired for Filing and Preparer copies.
These settings determine the orientation of the mailing slip that is automatically included with each printed return. Portrait is selected by default. Select Landscape to change the orientation.
This setting determines the alignment of the return address on the printed mailing slip. Left is selected by default. Select Center to change the alignment.
These settings determine which Check Return reports (if any) will be automatically included with each printed return. Available selections are:
All except Skip reports if no errors and Report E-file are selected by default. Select and/or clear check boxes as desired to change these settings.
Click View/Edit Print Packets to display the Print Packets dialog box.
After making changes to Preferences , click Apply to save your changes and close the Preferences dialog box, or click OK to save your changes and leave the Preferences dialog box open.